Eject an External Drive
or a Flash Drive
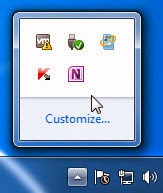
 1. In the lower-right corner of the screen, known as the
notification area, look for an icon with a green check
mark on it. It’s the Safely Remove Hardware icon. From the Safely Remove Hardware dialog box, select the device you want to eject and click
the Stop button.
3. Click OK in the next window that appears, and wait
until you see the message.
If you’re using or exploring the drive, you can’t eject it. Close all
applications and windows involving the drive before ejecting it.
4. Click OK. When you receive confirmation that the drive
can be safely removed, unplug it from your laptop.
5. If the drive uses external power, turn it off now.
You must use this command every time you remove an external
drive from your laptop. Failure to do so can cause file corruption
and damage the drive, especially if it’s powered by your laptop
No comments:
Post a Comment